We are delighted to introduce the Liminal Firewall, a revolutionary security enhancement for digital asset management. This significant advancement is designed to fortify your digital assets' security
while ensuring seamless governance and operational efficiency.
Here's an in-depth look at how this integration affects your current systems, the operational guide to utilising the Firewall effectively, and the documentation needed for a seamless transition to this more secure framework.
Explore the Liminal Firewall Guide>>
➡️ In this article
1. About Wallet V2 and difference between V1 and V2 Wallets.
2. Activating Firewall Features
3. Getting Started with Liminal Firewall
4. Liminal Firewall Policies
5. Transaction Lifecycle with Firewall
6. How to Enable Liminal Firewall
Transition to Enhanced Security with Wallet V2
Existing MPC Cold Wallets are already compatible with Wallet V2, thus inherently supporting the Liminal Firewall.
However, for Multisig Cold Wallets and Hot Wallets operating as Wallet V1, the creation of a new Wallet V2 is necessary to utilize the Firewall's advanced security features.
What are the differences between Wallet V1 and V2?
The teams are broadly divided into two categories:
1️⃣ Non-Signing Team (Primarily responsible for the initiation of a transaction, and can be assigned as Firewall team approver)
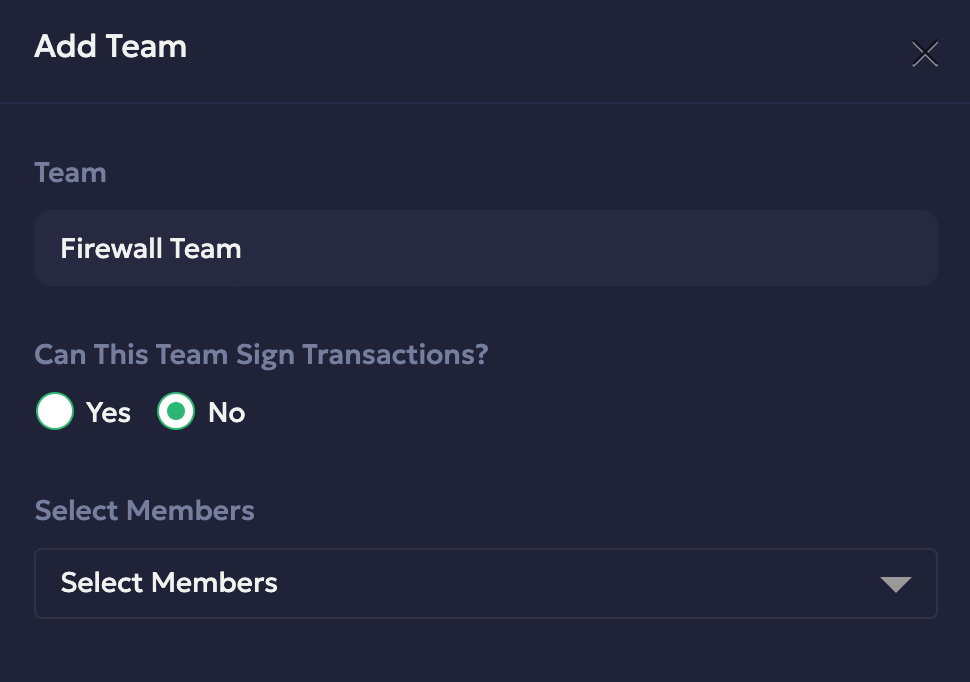
2️⃣ Signing Team (Responsible for signing the transaction)
1. The signing team type can be one amongst
- Mobile (This team is solely responsible for signing via mobile device)
- Hardware (This team is solely responsible for signing via Ledger or Trezor)
2. Chain Support in Wallet V2
- MPC Cold Wallet: All Chain supported in Liminal
- Multisig Cold Wallet: UTXO, EVM, TRON
- Cold Wallet: UTXO, EVM, TRON
Activating Firewall Features
To initiate the use of Liminal Firewall for Self Custody, customers are required to get in touch with our customer support team. This initial step ensures that the activation process is handled professionally, catering to your specific security needs and configurations.
➡️ Contacting Customer Support: Your journey begins by reaching out to our dedicated customer support team. The Firewall's activation and initial setup require a tailored approach, ensuring it aligns perfectly with your security needs and organizational structure.
➡️ Completing the Configuration Worksheet: Upon contacting customer support, you will receive a configuration worksheet. This document is crucial for capturing your specific requirements and serves as a blueprint for customizing the Firewall's rules.
➡️ Fill out the worksheet with details about your policies, compliance preferences, and any specific threats you wish to mitigate.
➡️ Submit the completed worksheet back to the support team for processing.
➡️ Firewall Policy Configuration: Based on the information provided in the worksheet, our team will work with you to configure the Firewall policies tailored to your needs.
➡️ Review the proposed policy configurations presented by our team, ensuring they align with your expectations and security requirements.
➡️ Request adjustments or confirm the setup to proceed with the final implementation of the Firewall rules.
This collaborative process ensures that the Firewall not only meets but exceeds the specific security needs of your organization, providing a foundation for robust digital asset protection.
Getting Started with Liminal Firewall
Liminal Firewall is a set of policies that add security, compliance, governance and workflow automation to your organization's transactions. This helps you to scale governance and authorization without compromising on efficiency.
How transaction lifecycle work with Liminal Firewall?
- A transaction is initiated by the initiator team assigned to the wallet
- Transaction enters firewall screening. It's evaluated against all policy rules configured by you. This will result in one of the three outcomes:
- Allow: A transaction is allowed to go through and proceeds to the signing phase.
- Block: A transaction is blocked and is canceled in case of an outgoing transaction, and frozen in case of an incoming transaction.
- Team Approval: The transaction required approval from the selected team to approve.
- Once the transaction is fully approved or the transaction doesn't violate any firewall policy, the signing team can sign the transaction.
Liminal Policies
Liminal's Firewall comprises of several policies that work independently to secure your transactions. A policy can have several rules that consists of various parameters and result in one outcome. The following policies are supported.
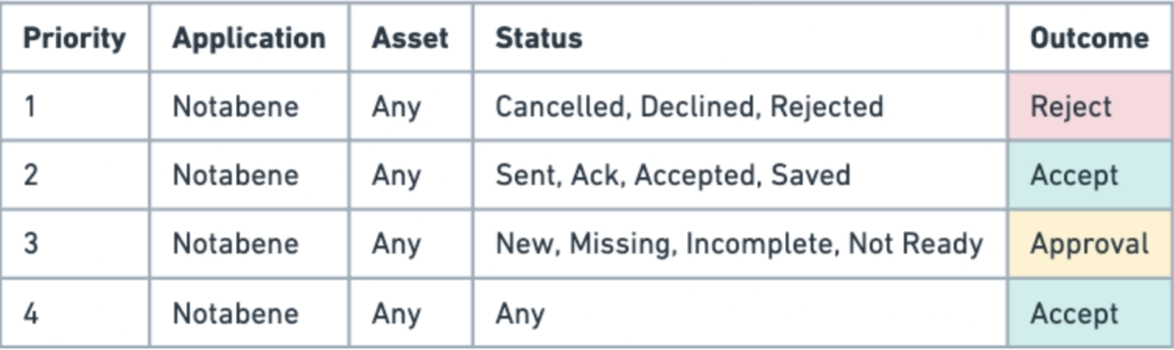
- Travel Rule: Rules for approval, rejection of transaction based on their Travel Rule status
- Policy App Provider: Notabene
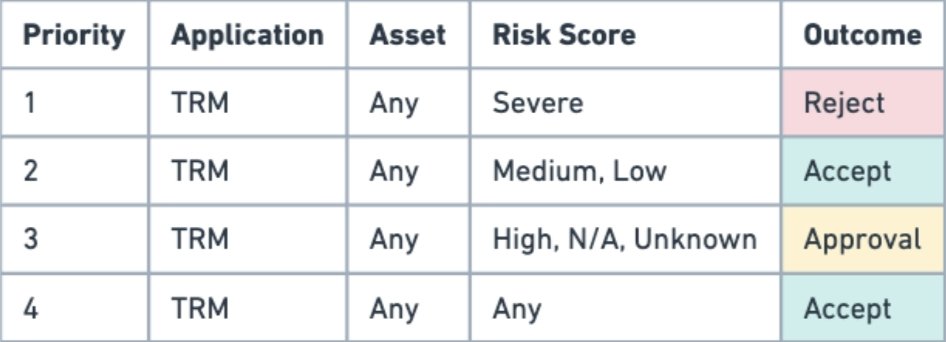
- Transaction Risk: Rules for approval, rejection of transaction based on their Transaction Risk Score
- Policy App Provider: TRM Labs
upcoming policies: Transfer, Anomaly, Heuristic, Country Risk
Transaction Lifecycle with Firewall
Step 1: Transaction Initiation
The lifecycle begins when a user within your organization initiates a transaction. In the Pending Action UI, now user can see the details from the sidebar panel. To reject or approve the request, user need "View" the transaction, and there will be a button to Approve or Reject the Transaction.
From image below, in case the first initiator want to reject the transaction that being processed. Initiator can reject the transaction from "Initiation" tab
Step 2: Preliminary Validation
Once a transaction is initiated, the Firewall performs preliminary validations to ensure that the basic parameters of the transaction comply with established policies. This is the core phase where the Liminal Firewall applies the configured security policies to the transaction. Based on the rules set during the Firewall configuration, each transaction is analyzed for potential risks and compliance requirements.
From the pending action details, user can see the result for Travel Rule Status and Transaction Risk Score. This information is evaluated against the organization’s Firewall policies.
Step 3: Decision Making
Allow, Block, or Approval: Depending on the outcome of the policy enforcement phase, the transaction is either allowed, blocked, or flagged for manual review.
As you can see from Image below, the transaction request for Firewall Approval. In this scenario "RezRahMee Team" is the approver team that need at least one person to approve the transaction.
Allowed transactions proceed automatically to the signing phase.
Blocked transactions are halted, with notifications sent to the relevant parties.
Transactions flagged for review are routed to designated approvers for further inspection
Step 4: Transaction Signing
Approved transactions move to the signing phase, where they are securely signed using cryptographic keys managed within the custody solution. This step ensures that only validated and approved transactions are executed on the blockchain.
Step 5: Broadcasting and Confirmation
Once signed, the transaction is broadcast to the relevant blockchain network for confirmation. The Firewall monitors the transaction until it is fully confirmed, ensuring its completion and immutability.
Step 6: Reporting and Audit Trail
Throughout the transaction lifecycle, the Liminal Firewall maintains detailed logs for compliance, auditing, and reporting purposes. This ensures transparency and traceability of all transactions processed through the Firewall.
How to Enable Liminal Firewall Provider App
To enable Travel Rule and Transaction Risk policies in Liminal's Firewall, you need to set up credential Notabene for Travel Rule, and TRM for Transaction Risk
- Go to your Vaults and log in
- Once you log in, go to the “Apps” menu on the sidebar and click “View” one of the apps
- Collect all necessary information for Notabene and TRM Credentials and input all necessary credentials for each app.
- After successfully adding the credentials, go to the “setting” menu on the sidebar and find the Compliance section
- Select Notabane for Travel Rule and TRM for Transaction Risk as the default settings
Conclusion
Using the Liminal Firewall ensures that your digital assets are protected by the most advanced security measures available today. By following these steps, from initial contact to monitor the transaction with Firewall, you can rest assured that your organization’s assets are under vigilant protection. Our team is dedicated to providing you with the support needed to navigate the complexities of digital asset security, making the process as seamless and effective as possible.
The rollout of Liminal Firewall signifies a significant step forward in safeguarding digital assets with advanced security measures. We appreciate your trust in us to secure your digital assets and look forward to assisting you throughout this transition and beyond.
If you've any questions, write to us at support@lmnl.app


